P2080 - Exhaust gas temperature sensor

ladret

New member
Hi Everbody!

I have a 2017 Crafter 2.0 177Hp, (DAVA) which I just had the EGR cooler replaced on due to disappearing coolant issue. (which is now fixed). Shortly after picking the van up from the garage the check engine light and the glow plug light came on.

Took it to a garage again and got P2080 fault codes, the mechanic reset it, but it came on again after a few minutes of driving.

P2080 - Exhaust gas temperature sensor circuit range/performance bank1 sensor 1.

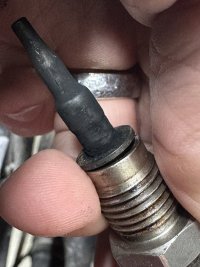
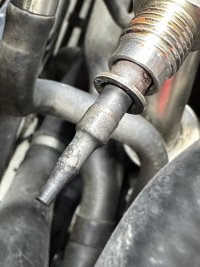
I took both the sensors out from the EGR cooler, and they were both sooty, and after cleaning, sensor 2 looks ok, the other looks rusty. (pics below) Put everything back after cleaning and scrubbing the rust off. But fault code comes back after a few minutes again. I measured the resistance on the sensor, it was around 0.21 kOhm. (no idea if this is within spec, but at least it confirms the cable is intact)

Could this be just a faulty sensor, or is there anything else I should check before replacing it? Thing is I had no engine lights or fault codes before having the EGR cooler replaced, so this issue seemingly popped up after the new EGR was fitted. No other parts where replaced, except a couple of seals belonging to the EGR.

See pics:

Sensor 1 before cleaning:
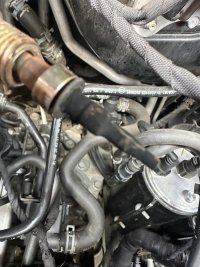
IMG_4372.jpeg

Sensor 1 after cleaning - all rusty. after a bit of scrubbing I got rid of most of the rust. But I didn't take a picture of that.
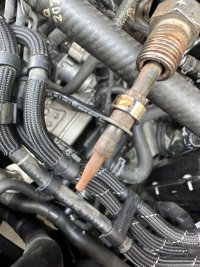
IMG_4373.jpeg

Sensor 2 before cleaning:

IMG_4381.jpeg

Sensor 2 after cleaning:


IMG_4382.jpeg


Hope I can get some advice on this.

Kind regards,
Henric
 
P2080 - Exhaust gas temperature sensor circuit range/performance bank1 sensor 1.
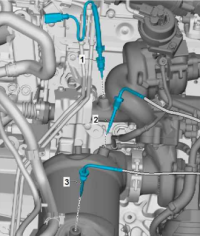
The code points to actual exhaust gas temperature sensor 1 - the sensor at exhaust manifold (in the exhaust flow just before turbo). The "1" in the picture below.
1718433987576.png
For further details please check the VW workshop manual for the DAVA engine - chapter 4.1. Search for "G235"

The up-to-date manual is available from erWin - for a fee (just buy one hour access - more than enough time to down ALL Crafter workshop manuals)

Or grab a sneaky copy from

I took both the sensors out from the EGR cooler,
The sensors in the EGR cooler are not related to fault P2080. Should be easy to verify by unplugging one at the time, turn ignition on and read triggered codes.


With a proper diagnostic tool (e.g. VCDS) you could read what each of the sensors is reporting - probably would find out that the G235 would tell it's -40 °C - indicating open circuit. Having such a tool would probably save a lot of time and effort, as well as money.

E.g. as below
IDE04035Exh.gas recirc. temperature, EGRTemp 11/12:54/51 °C
IDE04090Exhaust temperature bank 1, S1/S2/S3/S4:88/98/84/--- °C
1st line: the readings of the two EGR sensors (11/12)​
2nd line: the readings of the four possible exhaust temperature sensors, however also reveals that engine DAVA doesn't have the exhaust sensor S4 (after the DPF). The fault P2080 points to sensor S1.​
 
Last edited:
The code points to actual exhaust gas temperature sensor 1 - the sensor at exhaust manifold (in the exhaust flow just before turbo). The "1" in the picture below.
Thanks mmi!

Seems I was looking in wrong place then, thanks for pointing that out.

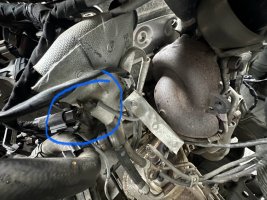
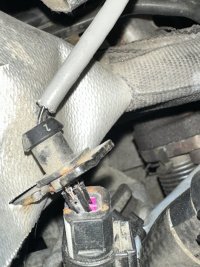
Had a look and it looks like the connector on that sensor is broken, pics below. Seems implausible that it would just break like that by itself.

I think ill invest in the VCDS tool.

IMG_4396.jpg

IMG_4402.jpeg
 
  • Like
Reactions: mmi
Quick update regarding this. I've took the broken connector apart and put the cables back using some electric tape. Fault code gone and engine runs fine after this.

Now, question is if I can order a replacement connector or if I have to replace the whole sensor and cable in order to fix this properly?

Big thanks to @mmi for pointing me in the right direction.
 
  • Like
Reactions: mmi
Excellent - well, that the point of failure was found. Thank you very much for your feedback - the excellent pictures!
Now, question is if I can order a replacement connector or if I have to replace the whole sensor and cable in order to fix this properly?
The connector has two wires/pins? Just asking because the picture of the broken connector (to my eye) shows more where it's broken. Also (interestingly) on sensor side (to my eye) the wire colours are black/white and black - per wiring diagram I was expecting to see brown and yellow. Not important - just curious - perhaps the sensor has been replaced at some point, or a change in production...

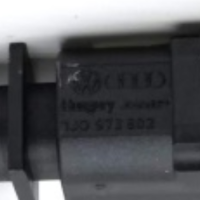
Anyways, did some googling by sensors' part number and the connector part number possibly is 1J0 973 802 - however, no guarantees on that - it's just my interpretation of a picture here - also it's never guaranteed that the seller's picture is from the correct sensor - could be just something similar!
1718521178650.png

I sourced the part number of the sensor from here - it has been quite a good source - of course, always useful to verify at dealer against your vehicle's VIN.

Select Free Services > CarProg2 > Select model year > Select body type SY-H or SZ-H ("restrictions") and double-click on that > :unsure:

E.g for the exhaust sensor navigate to 9-Electrical systems - Picture 906-015

1718522238545.png

1718521764135.png

Clicking on part number "..GQ" you'll find that actually the "...GQ" is superseded by part "...KC"

PS. Welcome to the Forum!
 
The connector has two wires/pins? Just asking because the picture of the broken connector (to my eye) shows more where it's broken. Also (interestingly) on sensor side (to my eye) the wire colours are black/white and black - per wiring diagram I was expecting to see brown and yellow. Not important - just curious - perhaps the sensor has been replaced at some point, or a change in production...
Yes, it’s only two, the picture is not really showing what’s going on there. I believe it’s the original part, it looks just as old and worn as all the other connectors.

The pins on the connector was intact, slightly bent but no problem inserting them into the other connector once I removed the plastic casing.

I wrapped it all in some insulation tape for now, will see how far that gets me.

PS. Welcome to the Forum!

Thanks! And thanks for the help!
 
  • Like
Reactions: mmi
Back
Top